Endpoint Routing Entries
After creating an NRS Endpoint, continue with the following procedure to configure the routing entries.
The NRS will send calls matching digits in a Routing entry to that Gateway Endpoint. If multiple matches occur, the call is always sent to the lowest Route cost Endpoint, equivalent to Least Cost Routing. 99% of the time, calls are not routed properly because of errors or omissions in the NRS Routing Entries.
Configuring routing entries
- Log on to NRS Manager (default: admin/admin).
- Select the Configuration tab
- Click set Standby DB view to switch from active to standby database view (you can't edit the active database).
- Click Routing Entries.
- Type the relevant Gateway Endpoint OR
Click the Look up link and perform a search. All configured endpoints appear. - Click the endpoint to configure as a Routing Entry.
- Select a DN type (if required)...
For UDP, select Private level 1 regional (UDP location code).
For CDP, select Private level 0 regional (CDP steering code). - Click Show.
The Routing Entries page appears.
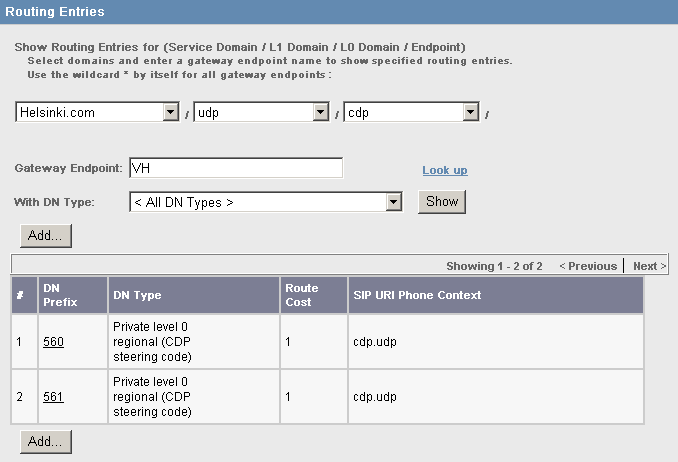
This Routing Entries page shows CDP entries: 560 and 561. Thus, calls to 560X and 561X will be sent to this endpoint.
- Click Add to add a new Routing Entry.
The Add Routing Entry page appears.
- Enter the DN prefix.
This is the CDP DSC steering code. - Enter the Route cost.
The higher the number, the higher the cost. This is equivalent to Least Cost Routing. - Click Save.
Now we have to commit the database changes, and make them active...
Updating the database
- Log on to NRS Manager (if not already).
- Click the Tools tab.
- Click the Database Actions tab.
The Database Actions page appears, showing the Database State as Changed. - From the Select database action menu, select Cut over & Commit.
- Click Submit.
The database is instantly committed, and there is practically no delay in implementing the changes.
Make some test calls, and determine if the changes work as expected.