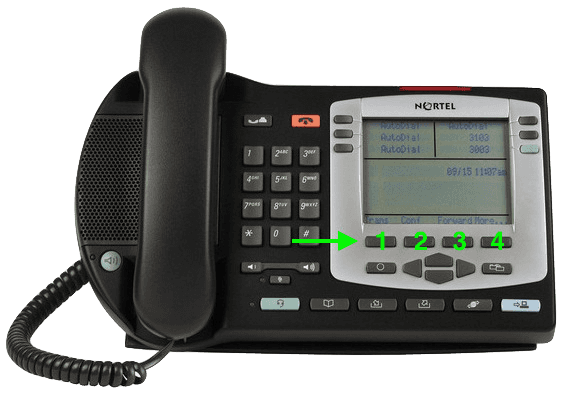
IP Phone 2004 – Settings.
With Manual provisioning, Nortel IP Telephone settings must be manually entered before it will work with the system. If a phone does not automatically register and function, or when adding a new set, edit the telephones local configuration settings as shown.
Follow these steps to access the i2004 local configuration:
1 Restart the telephone by disconnecting and then reconnecting the line cord. After about four seconds, the top light flashes and the text NORTEL appears on the screen.
2 Immediately, when the greeting appears, quickly press the four soft keys, one at a time, from left to right. Soft keys are located directly under the display. These keys must be pressed one after the other within 1.5 seconds or the telephone will not go into configuration mode.

- If Manual CFG DHCP (0 No, 1 Yes) appears on the screen, you have successfully accessed the configuration mode.
- If any other message appears, disconnect, then reconnect the power, and try to access the configuration mode again.
| Soft Key | Description |
|---|---|
| OK | Accept current settings and proceed to the next option. |
| BkSpace | Erase the current entry in order to change it. |
| Cancel | The IP Phone reboots without saving any changes. |
| Clear | Clear an entire configuration entry. |
3 Enter the parameters as prompted. Press OK to accept the current setting and move forward, BkSpace to erase the current entry in order to change it. Use the numeric keypad to enter values, use the star (*) key to enter a full stop in IP addresses.
| Prompt | Response | Note |
|---|---|---|
| EAP Enable | 0 | An entry of zero is "No", or disables the feature. |
| DHCP | 0 | Disable DHCP to manually enter IP settings (default). |
| SET IP | 192.168.0.201 | Phone IP address, must be unique, refer to installers list. |
| NETMASK | 255.255.255.192 | Refer to installers list. |
| DEFGW | 192.168.0.254 | IP address of the LAN Gateway. Refer to installers list. |
| S1 IP | 192.168.0.194 | Branch Office Call Server IP address, or CS1K Node IP. |
| S1 PORT | 7000 | 7000 for BCM, 4100 for CS1K |
| S1 ACTION | 1 | Primary action code, always set to 1 |
| S1 RETRY | 5 | The number of times the set should attempt to connect to S1 |
| S2 IP | 0.0.0.0 | S2 settings are optional, in the event S1 is unreachable |
| S2 PORT | 7000 | 7000 for BCM, 4100 for CS1K |
| S2 ACTION | 1 | Always set to 1 |
| S2 RETRY | 5 | S2 connect attempts |
| Cfg XAS? | 0 | |
| Voice VLAN | 0 | |
| PC Port | 0 | 1-On, 0-Off: 0 to disable the phones rear PC port |
| DATA VLAN | 0 | |
| DUPLEX | 0 | |
| GARP IGNORE | 0 |
When you have entered all the configuration information, the telephone reboots and attempts to connect to the call server S1 address. The message Locating Server appears on the display. If the connection is successful, the message changes to Connecting to Server after about 15 seconds. Initialisation may take several minutes. Do not disturb the telephone during this time. If S1 is not found, the phone will try S2.
Once the telephone connects to a valid call server, it registers, and the display shows the DN number and a date
display. The six feature keys at the top of the display are also labelled (as programmed). The telephone is ready to use. The configuration will remain after a power failure.