Asterisk PBX with OpenVPN on CentOS6
Introduction
When configured with a Digium analog card, the following enables mobile phones to call any telephone on the public telephone network by using the trunks of the organizations existing telephone system. The call segment between mobile phone and the gateway is secured, to provide privacy when making mobile calls from untrusted international locations to domestic or trusted destinations.
The following was built using an a old Dell Optiplex PC with a Pentium 4 processor and 1 GB RAM, so it should work on just about anything you have lying around your store room. This procedure will get you 95% of the way there, but knowledge of Linux is helpful when things don't go as planned.
This build will allow the administrator to connect a remote cell phone (Currently Android) to the PBX via a virtual private network. Then use a soft phone dialer (Currently Zoiper) to dial through the Asterisk PBX to another PBX and use the routes from there. The Asterisk PBX and the legacy PBX are connected with analog trunks.
It is extremely important to make every effort to secure your server as well as possible. Always put your server behind a firewall and only allow traffic through the firewall that is VPN related (UDP 1149). Make sure SIP and IAX2 ports are not open on the router's firewall! See also: Linux Security Basics.
1. Asterisk Now installation
- Download Asterisk Now3.0 (32 bit Linux) from internet and burn it to a DVD.
- Make note of slot numbers on the Digium card (Mine was TDM410P)
- Red daughter boards (FXO trunk) on the main card. (Mine on slot 3 &4)
- Green daughterboard (FXS station) on the main card (Mine on slot 1).
- Install the Digium analog card in the PCI slot or the PCI express slot.
- Connect the power from a spare Molex power connector or get a SATA to Molex adapter.
- Insert the Asterisk Now DVD and boot the computer.
- Set the boot order in the BIOS to boot from DVD first and restart the PC.
- At the Asterisk Now splash screen enter "1 biosdevname=eth0" without quotes.
- Follow the prompts to set the time zone and the root password.
- When complete root boot and REMOVE THE DVD!
2. Install OpenVPN Access Server
- Download the Access Server software with the following command:
wget http://openvpn.net/index.php/access-server/download-openvpn-as-sw/113htl?osfamily=CentOS/openvpn-as-1.8.5-CentOS6.i386.rpm - Then type: rpm -I openvpn-as-1.8.5-CentOS6.i386.rpm
3. Configure the OpenVPN Access Server
- Change the default admin password with passwd openvpn and press enter. When prompted enter the new password.
- Add the client user accounts adduser username and set the password passwd username.
- Login to the OpenVPN server from a another PC https://ipaddress:943/admin
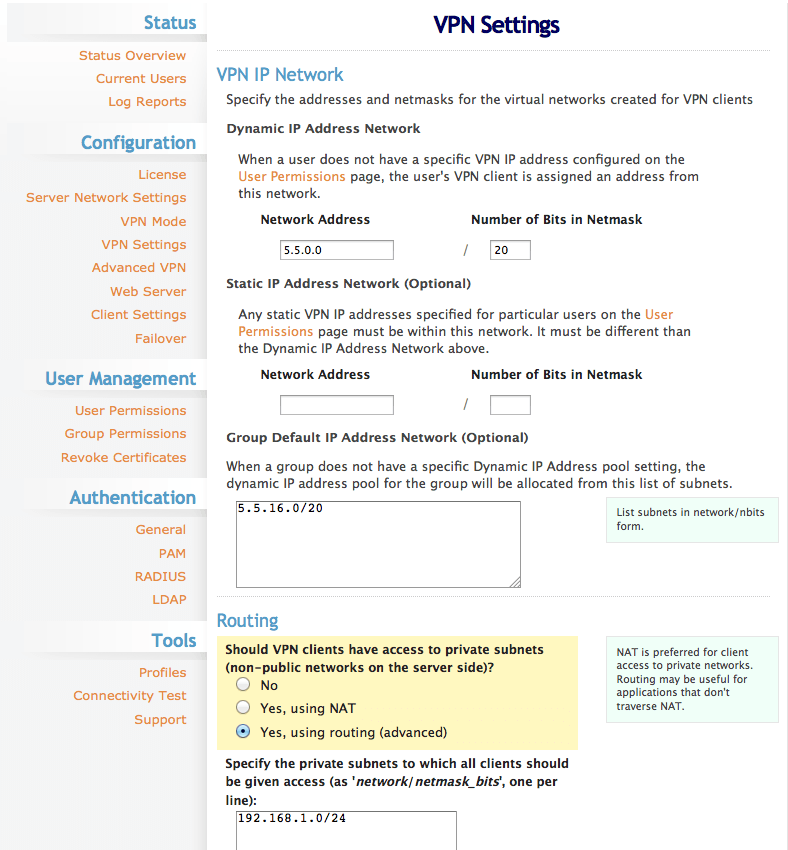
- See the screenshots below to finish the configuration.
- VPN Settings Tab, set "ROUTING" to "Yes, Using routing."
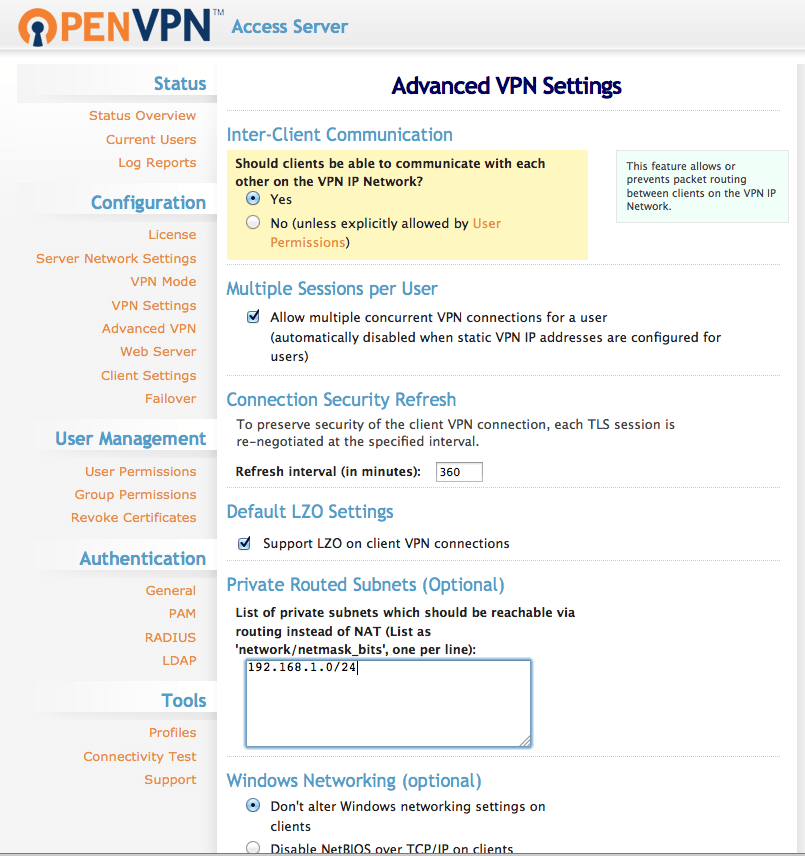
- Advanced VPN Settings, Inter-Client communication, set to yes.
- Private Route Subnets, set to the local LAN 192.168.1.0/24
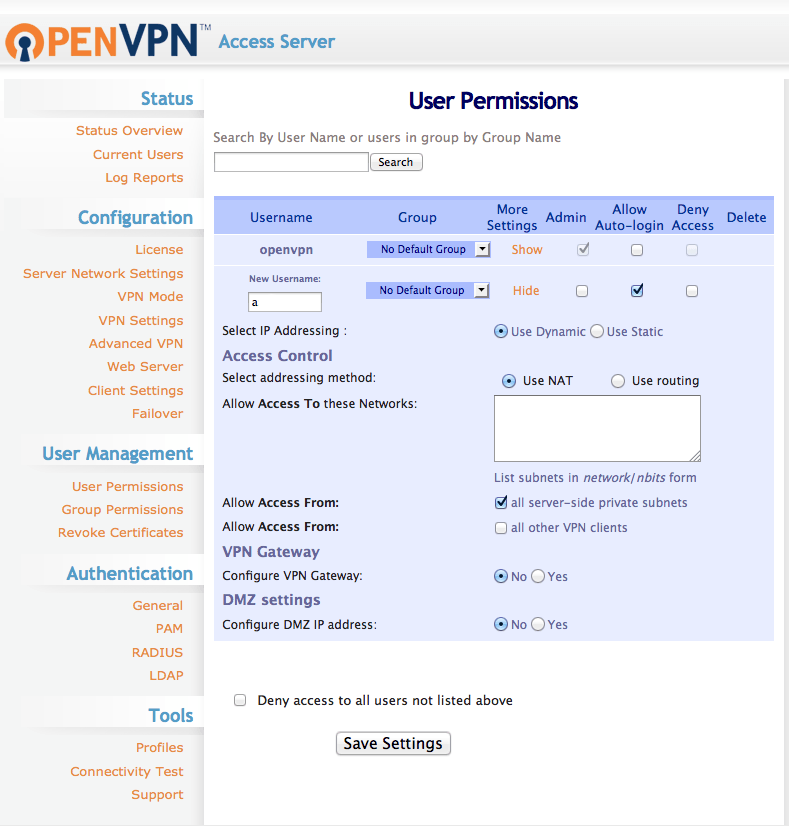
- User Management, User Permissions, enter the username, show more settings, check Allow auto-login, check Allow access from: all server-side private subnets.
4. Update the Linux server and, modify the firewall.
- yum update. Press enter and answer yes when prompted.
- Modify the firewall. iptables -v -n -line-numbers |more.
- Press enter and review any lines with DROP especially in the chain AS0.
- Modify the AS0_IN_POST chain by removing the drop statement. iptables -D AS0_IN_POST 2.
- Save the changes service iptables save. (/etc/sysconfig/iptables)
5. Configure the analog card (DAHDI from DIGIUM TDM410P or equivalent)
- Uninstall the DAHDI Module from within the PBX admin (FREEPBX)
- Login http://ipaddress using the default user/pwd: admin/admin. Change this later.
- Admin Tab, Module Admin, Connectivity section. Click on DAHDI and disable, save, and apply config link at the top (its bright red).
- From the Linux command line
- lsdahdi shows the card. dahdi_scan is another good command.
- /usr/sbin/dahdi_genconfig v this generates two files that you should review:
- cat /etc/dahdi/system.conf
cat /etc/asterisk/dahdi-channels.conf - cat /etc/dahdi/system.conf
- dahdi-cfg -v
- Edit dahdi channels: nano /etc/asterisk/dahdi-channels.conf
- Change 'context =default' to 'context=from-pstn' on any channel with a fxo module (red daughterboard)
- Edit Chan Dahdi: nano /etc/asterisk/chan_dahdi.conf
- At the bottom set/ensure channel=3-4 are FXO daughterboards (FSX signaling)
- amportal restart will restart Asterisk and DAHDI.
6. Configure the PBX
- Browse to http://ipaddress and login admin/admin.
- Add SIP or IAX2 extensions. Voiper works well with IAX2. Go to Applications tab, Extensions.
- Select IAX from the dropdown menu.
- User Extension: extension
- Display Name: User's name.
- Outbound CID: the telephone number it will have when dialing out.
- Secret: set the password or keep the very long string generated.
- Voicemail: Enabled
- Voicemail Password: **** four digits works for me.
- Click Submit. Add as many extensions as you want.
- Add the DAHDI Channel/s
- On the connectivity tab, DAHDI channel DID, Add a channel and set it to 3 or slot of FXO module on the DAHDI card.
- Add the DAHDI trunks/route
- Connectivity Tab, Trunks, Add DAHDI Trunk
- Trunk Name: pstn1 and set the outbound Caller ID to the phone number.
- Connectivity Tab, Outbound Route. Set the route name, Route CID, and dial pattern. Mine is in the 703 area code so my dial patterns are 202XXXXXXX and 703XXXXXXX to match any call made in the DC metro area. Set the Trunk Sequence for Matched Routes to 0 DAHDI Channel g0.
- Also add patterns for dialing across the analog trunk to another PBX.
Select local, long distance, and international templates. Prepend a 9 if you don't want to dial a 9 to get and outside line.
- Add Google Voice [Motif]
- Create a Google account, log in and select More Menu, Select Even More, scroll down to the Home and Office section and select Google Voice. Create a phone number in the area code you are in or wish to dial. Click on the phone number and set Forward Calls To Google Chat. Click on Edit and set voicemail access to No.
- On the PBX select the Connectivity Tab, Google Voice. Fill in the username, password, and phone number fields. Put a check in the Edit Trunk box.
- Select the Connectivity Tab, Outbound Routes. Fill in the route name, route CID, and set the dial pattern. For example my area code was 305 so my dial pattern is set to 305XXXXXXX. Set the trunk sequence for matched routes to the GVM_305xxxxxxx trunk. Click save and submit.
- Add an IVR (Call Tree)
- First add a system recording from the Admin Tab. Enter the extension in the first field and click on Go. Go to that extension and dial *77 to record the message.
- Select the Admin Tab, Module Admin, Check Online, Applications Section, IVR: Download and Install. Press the Process button and confirm. It will install click on the Apply Config button. You can install and update other modules from here as well! See recommended modules 6.9
- Select Applications Tab, IVR, add a new IVR. Fill in the Name as Main, select the ivr recording made earlier, and add the IVR Entries 1 Extension XXXX, 2 Extension XXXX and so on. Save and Apply.
- Create an inbound route to send calls to the IVR.
- Connectivity Tab, Inbound Routes, add a description, DID Number, and set the destination to the IVR Main. Calls will now route to the IVR where they can make a selection.
- Change the Default Passwords.
- Admin Tab: Administrators, Click on Admin the right, change password, submit changes and apply config.
- Settings Tab, Advanced Settings, System Setup Section, User Portal Admin Password: Change it, submit, and apply config.
- Install/upgrade suggested modules.
- Admin Tab, Module Admin, Check Online.
- Core, Update Feature code Admin, Recordings, Google Voice, CDR Reports, System Dashboard, Music on Hold, Voicemail.
- Install Backup & Restore, Call Forward, Conferences, Follow Me, and IVR.
7. Install the client software on the Android phone.
- SECURE THE PHONE WITH A STRONG PASSWORD!
- From Google Play download the OpenVPN client. Connect the phone to a PC.
- From the PC browse to https://ipaddress:943/
- Login NOT Connect to openvpn access server using the user account created in step 3.2.
- On the next screen download the user locked autologin profile. A client.ovpn file will be saved to the pc.
- Edit the file by changing the IP address from the local IP to a public IP address given to you by the internet service provider or a DNS name if you have dynamic DNS. I used NO-IP for mine.
- Login to the internet router and set a port forward for UDP 1149 to the LAN address of the server.
- Move the client.ovpn file to the documents folder on the phone.
- Open the OpenVPN client and select the option button and select Import Profile from SD card. Browse to the Documents folder and select the client.ovpn file and click Save.
- Click on the Connect button to connect to the VPN. If it doesn't respond check your firewall on the router and the server iptables.
- DELETE THE CLIENT.OVPN FILE
- From Google Play download the Zoiper soft phone.
- Open the softphone and add an IAX2 account. Enter the extension and password set on the PBX created in step 6.2. Set the IP address of the server to 5.5.8.1 or the address for the AS0 interface on the server. To find this address from the command line on the server type ifconfig AS0.
- Click on the Register button and start making and receiving phone calls. Since your are registered to the tunnel interface all of the signaling and voice traffic is encrypted in the VPN!